CreativeAI - Image Generation from Text
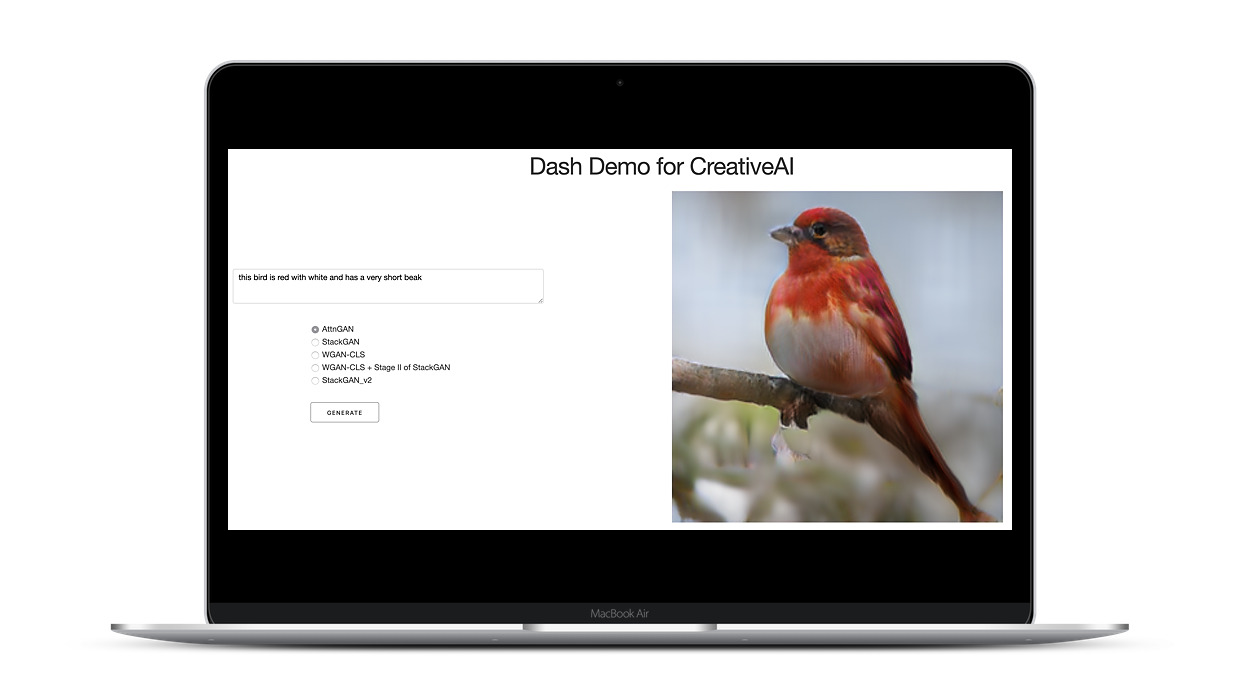
Lead by three data experienced scientists of Capgemini, we developed a prototype for a text-to-image generation website as part of the TUM Data Innovation Lab. On our website, users can enter an image description and select an ML model which then generates a corresponding image, as shown above.
During the whole project, we put a strong emphasis on good software engineering practices: we set up a full CI/CD pipeline including automated tests, linting, and formatting checks, and built a modular, containerized web application ready to be deployed in the cloud. We also conducted research on a variety of topics, which we presented in our weekly meetings with Capgemini, created a 20-page final report, and presented our work publicly at TUM.
Project Overview
- Duration: April to August 2019 (5 months)
- Team: Four other M.Sc. Math/Informatics/Data Science students and me
- My Responsibilities: GAN research and model development, DevOps
Text to Image Generation
The basic idea of text-to-image generation is fairly simple: You first embed a text description into a lower-dimensional feature vector and then use that as the conditioning input of a conditional GAN while also adding some randomness into the generator so the generated images are not deterministic.
What varies from paper to paper is how these individual steps are implemented. The state-of-the-art method is AttnGAN, which in turn is an extension of another popular method called StackGAN. In the following, we’ll have a brief look at how those methods work.
StackGAN stacks several of the aforementioned conditional GANs on top of each other (as the name implies). The first GAN is conditioned on the text description only, and subsequent GANs are conditioned on the text description as well as the output of the previous GAN. The point of having multiple layers of GANs is to have a continuous refinement process: The earlier GANs generate coarse low-resolution (64x64) images, which the subsequent GANs then refine into more and more detailed outputs with higher resolutions (up to 256x256).
Side note: this idea of continuous GAN refinement not only works for text-to-image generation. It is a universally useful concept that can be applied to almost any GAN. See Tero Karras’s paper on Progressive Growing for more details.
Additionally, StackGAN introduced a data augmentation technique for conditional text inputs: Instead of using real image captions directly, they first fit a Gaussian on the embeddings before training and then sample from this distribution during training. This allows them to train more robust models by using more varied training data. Finally, randomness is added into the generation process simply by concatenating random noise to the sampled embedding.
In a follow-up paper called StackGAN++, the original authors improve upon their original work, but the basic idea stays the same, they just stack even more GANs with a slightly different architecture. They also modified the adversarial loss function to have both conditional and unconditional discriminator loss terms and added a color regularization term, but both of those changes just lead to slightly better fidelity and are negligible in the bigger picture.
The state-of-the-art method AttnGAN then builds upon StackGAN++. The main contribution, as the name suggests, is adding Attention layers in several places. This allows the network to refine image subregions corresponding to specific individual words in the description. Specifically, AttnGAN feeds the text embeddings into an attention module together with the previous generations for all higher-level GANs in the StackGAN architecture and they also add what they call Deep Attentional Multimodal Similarity Model (DAMSM), which provides an additional attention-based loss that calculates how similar the feature embedding of the final generated image is to the text embedding.
TL;DR: StackGAN just means stacking a bunch of conditional GANs on top of each other with some smart way of augmenting data and incorporating randomness. AttnGAN is StackGAN with additional attention modules.
We implemented all the models described above in vanilla TensorFlow and added several techniques for improved training stability, such as WGAN-GP loss, spectral normalization, mini-batch discrimination, and one-sided label smoothing.
System Architecture
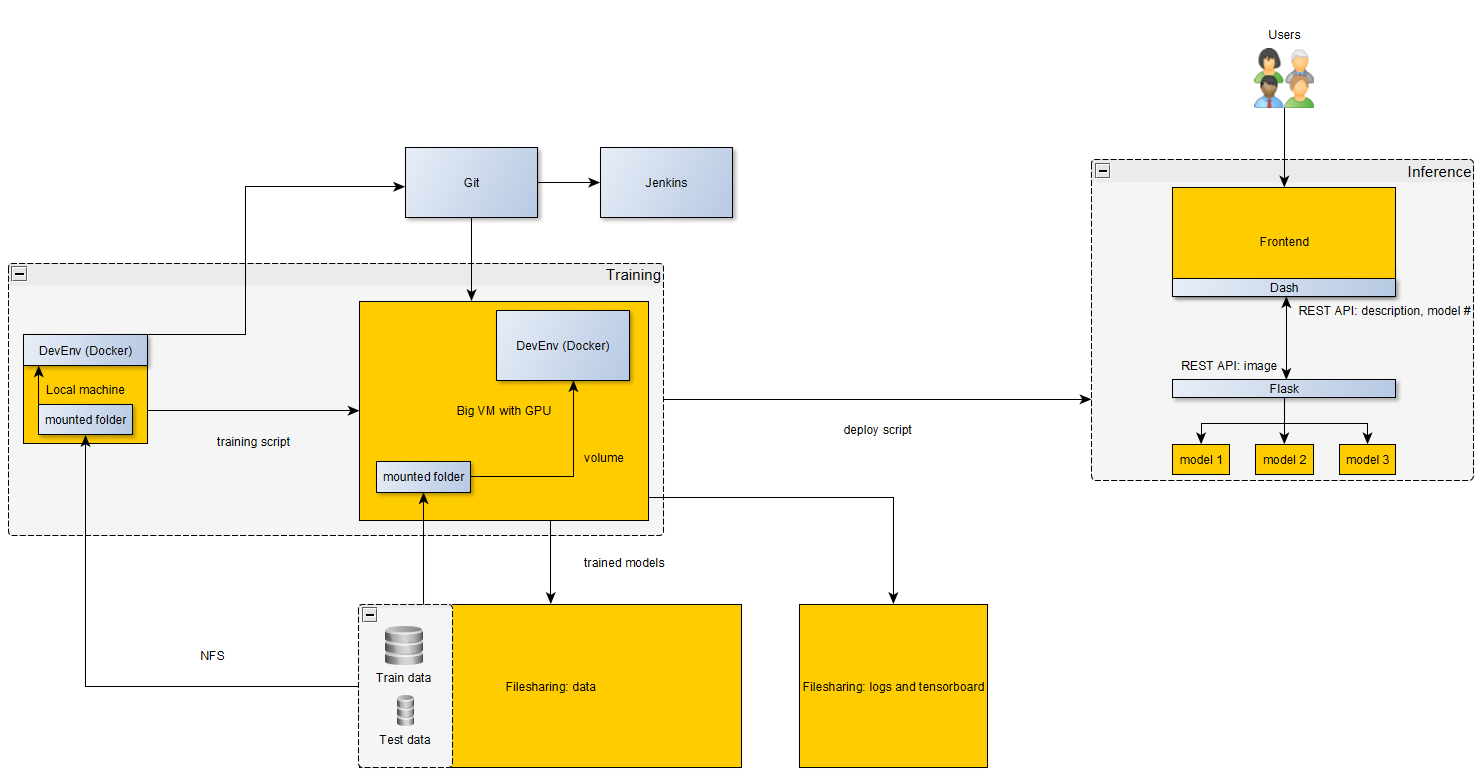
We then built a website around our models using Flask and Dash. Dash is used for the frontend code that defines what the user sees (similar to HTML/CSS/Javascript, but completely in Python) and Flask wraps the ML models so Dash can communicate with them via REST API requests. We also designed the different components as standalone microservices running in separate Docker containers, configured their communication via Docker compose, and used Docker volumes for shared data.
During development, we also used Docker to have a consistent environment across all of our personal machines, the virtual GPU server used for model training, and the cloud instance where the models were finally deployed. Also, we mounted the training data on all machines from external storage to ensure we all had consistent data, and we wrote detailed logs of all training runs to another external storage that was persistent beyond the project duration so all of our experiments would later be reproducible if needed.
Lastly, we set up a Jenkins CI pipeline on a dedicated VM that performs automated code checks within a Docker container whenever someone pushes to git. We defined the following four CI stages:
- build: builds the docker container and compiles the project
- test: executes all unit tests in the project
- lint: performs linting checks (code quality checks) using PyLint
- black: ensures that code is formatted correctly using Black
If all checks pass, a green indicator is displayed in Gitlab next to the corresponding commit of the branch. Otherwise, a red indicator is shown together with the Jenkins summary. In that case, the affected branch is locked from being merged. This ensured that new functionality complied with common coding guidelines and did not break existing code.
Our full architecture is shown below:
Result
During the project, we conducted extensive GAN research, reimplemented and trained several models in TensorFlow, and built a demo website with sophisticated system architecture. Overall, our efforts were mostly focused on engineering issues, so we did not find time to improve models beyond the existing state-of-the-art or to perform any detailed ablations. Still, we were able to build a cool demo and received a very good 1.3 grade, so the effort was worth it.
Takeaways
- If you’re like me a data scientist who mostly codes in Python, the combination of Flask and Dash is awesome. They allow you to build and deploy web interfaces for your models in no time without having to write any Javascript.
- Vanilla TensorFlow is nice for deployment, but it’s clunky, hard to debug, and very slow during development. In the future, I would always build models using either Keras or PyTorch and then worry about the deployment later (if your model is bad you don’t need to deploy it anyways).
- If you’re working in a larger group, good software engineering is crucial. CI with automated tests, consistent environments with Docker, and the design of modular, decoupled microservices all make your life easier down the line. However, they also have a big setup cost and will slow down initial development. Thus, I would only recommend them if you work on a project for a longer time (1 year+) or collaborate with many (10+) people. If you’re working on a small short-term project, it might be better to just focus on getting stuff done.